SpringCloud(二)Security OAuth2 的 四种授权模式
在上一篇文章中,我们了解了 Security OAuth2 相关的一些基础知识,和整个四种授权模式的交互过程,那么本篇是对四种模式的实践,废话不多说,我们直接开始,SpringCloud 相关的实践代码均托管在rc-cluster-springcloud项目的中,项目使用的一些依赖版本如下
- gradle:6.1.1
- SpringBoot:2.2.6.RELEASE
- SpringCloud:Hoxton.SR4
- JDK:1.8
实践
在实践阶段为了方便,我将资源服务器和授权服务器整合在一个服务上,在后续扩展部分,会提供实际生产环境中的常用做法,先看项目的包依赖
1 | implementation 'org.springframework.boot:spring-boot-starter-web' |
下面的两点,不管是什么模式的授权方式,写法都是一样
- 业务 API
1
2
3
4
5
6
7
8
9
10
11
12
13
14
15
16
17
18
19
20
21
22
23
24
25
26
27
28
29
30
31
32
33
34
35
36
37
38
39
40
41
42
43
44
45
46
47
48
49
50
51
52
53
54
55
56
57
58/**
* 业务 API
* 为了方便我直接将 UserInfo 对象放在了 Controller 类中
*
*/
public class UserController {
public ResponseEntity<UserInfo> getUserInfo() {
User user = (User) SecurityContextHolder.getContext().getAuthentication().getPrincipal();
String email = user.getUsername() + "@gmail.com";
UserInfo userInfo = new UserInfo();
userInfo.setName(user.getUsername());
userInfo.setEmail(email);
// TODO 不同的授权选择不同的模式
// 授权码模式
userInfo.setGrantType("authorization_code");
// 客户端模式
userInfo.setGrantType("client_credentials");
// 密码模式
userInfo.setGrantType("password");
// 简化模式
userInfo.setGrantType("implicit");
return ResponseEntity.ok(userInfo);
}
public static class UserInfo {
private String name;
private String email;
private String grantType;
public String getName() {
return name;
}
public void setName(String name) {
this.name = name;
}
public String getEmail() {
return email;
}
public void setEmail(String email) {
this.email = email;
}
public String getGrantType() {
return grantType;
}
public void setGrantType(String grantType) {
this.grantType = grantType;
}
}
} - 资源服务
1
2
3
4
5
6
7
8
9
10
11
12
13
14
15
16
17
18
19
20
21
22
23
24
25
26
27
28
/**
* 资源服务器
*
* @author : Jerry xu
* @date : 2020/7/17 23:45
*/
public class OAuth2ResourceServer extends ResourceServerConfigurerAdapter {
/**
* 用来配置对资源的访问控制规则
* 默认设置下,所有非 /oauth/** 路经下的资源都是被保护的
*
* @param http http
* @throws Exception exception
*/
public void configure(HttpSecurity http) throws Exception {
http.authorizeRequests()
.anyRequest()
.authenticated()
.and()
.requestMatchers()
// 对 /api/** 路经下的资源进行了保护
.antMatchers("/api/**");
}
}
权码模式
代码实现
授权服务器配置
1 |
|
Security Web安全配置
1 |
|
测试
整个过程请看视频
https://res.cloudinary.com/incoder/video/upload/v1594910477/blog/video/auth.mp4
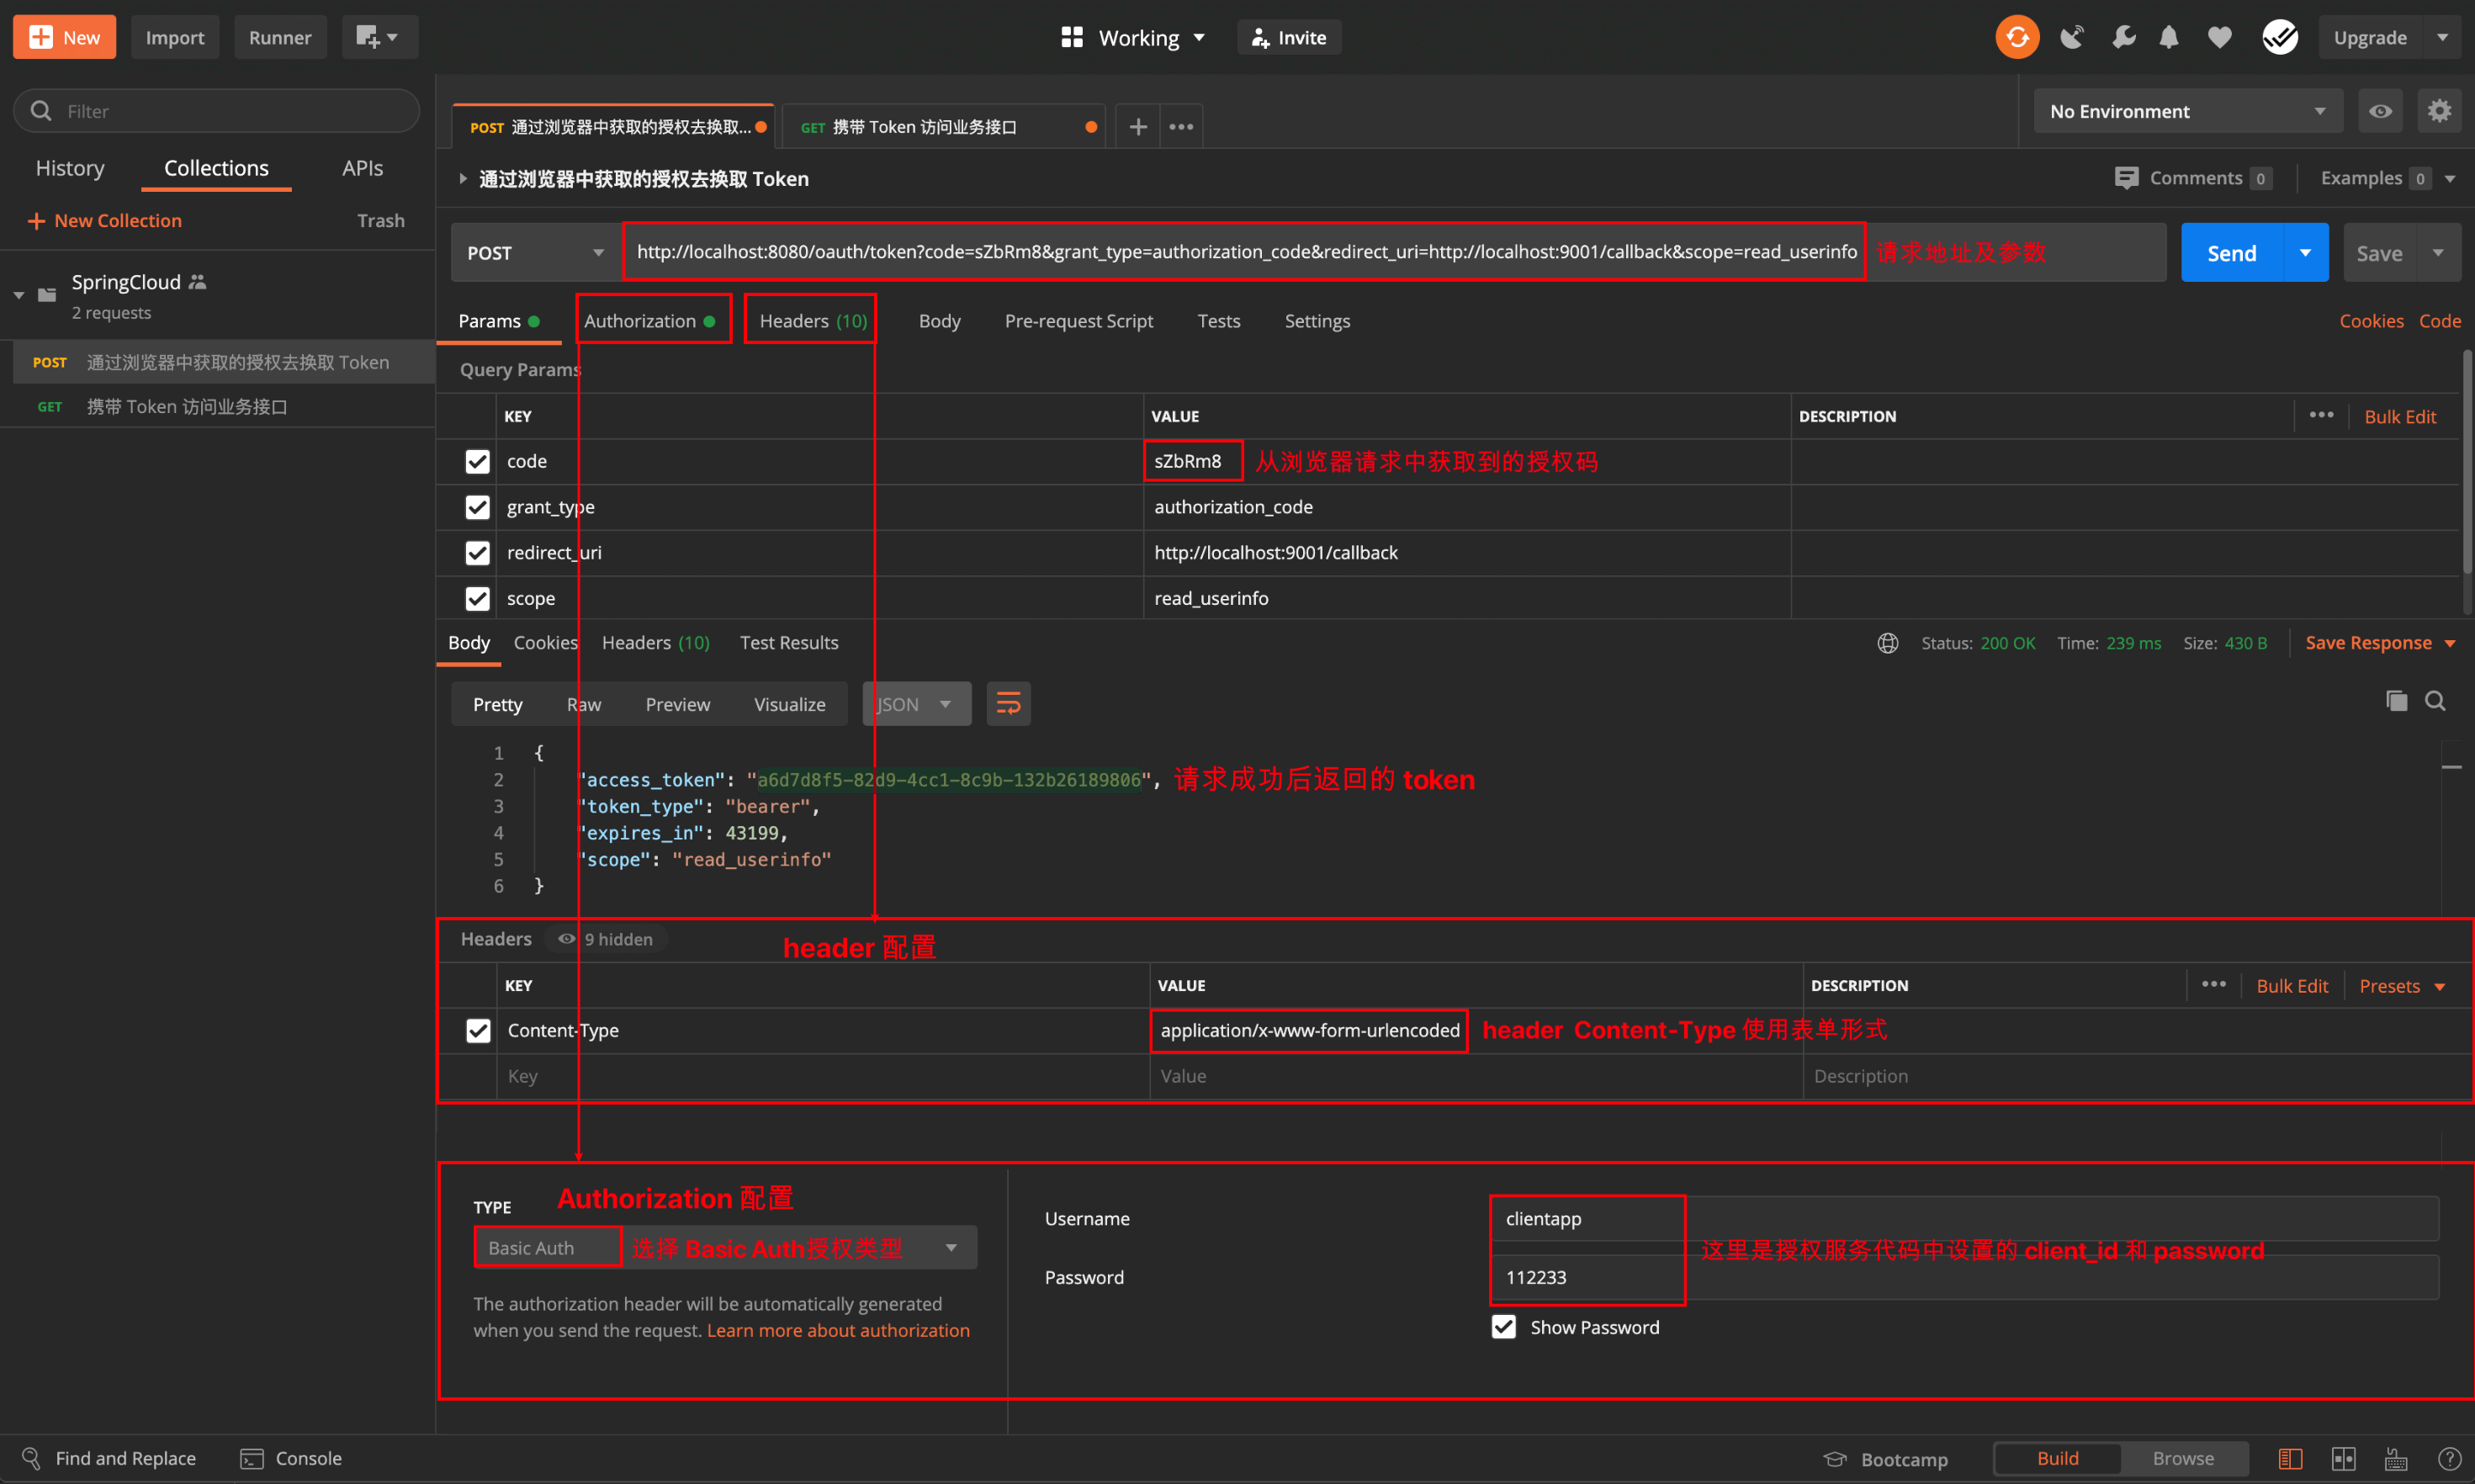
- 获取授权
1
2
# 浏览器请求地址
http://localhost:8080/oauth/authorize?client_id=clientapp&redirect_uri=http://localhost:9001/callback&response_type=code&scope=read_userinfo - 使用授权码获取 Token
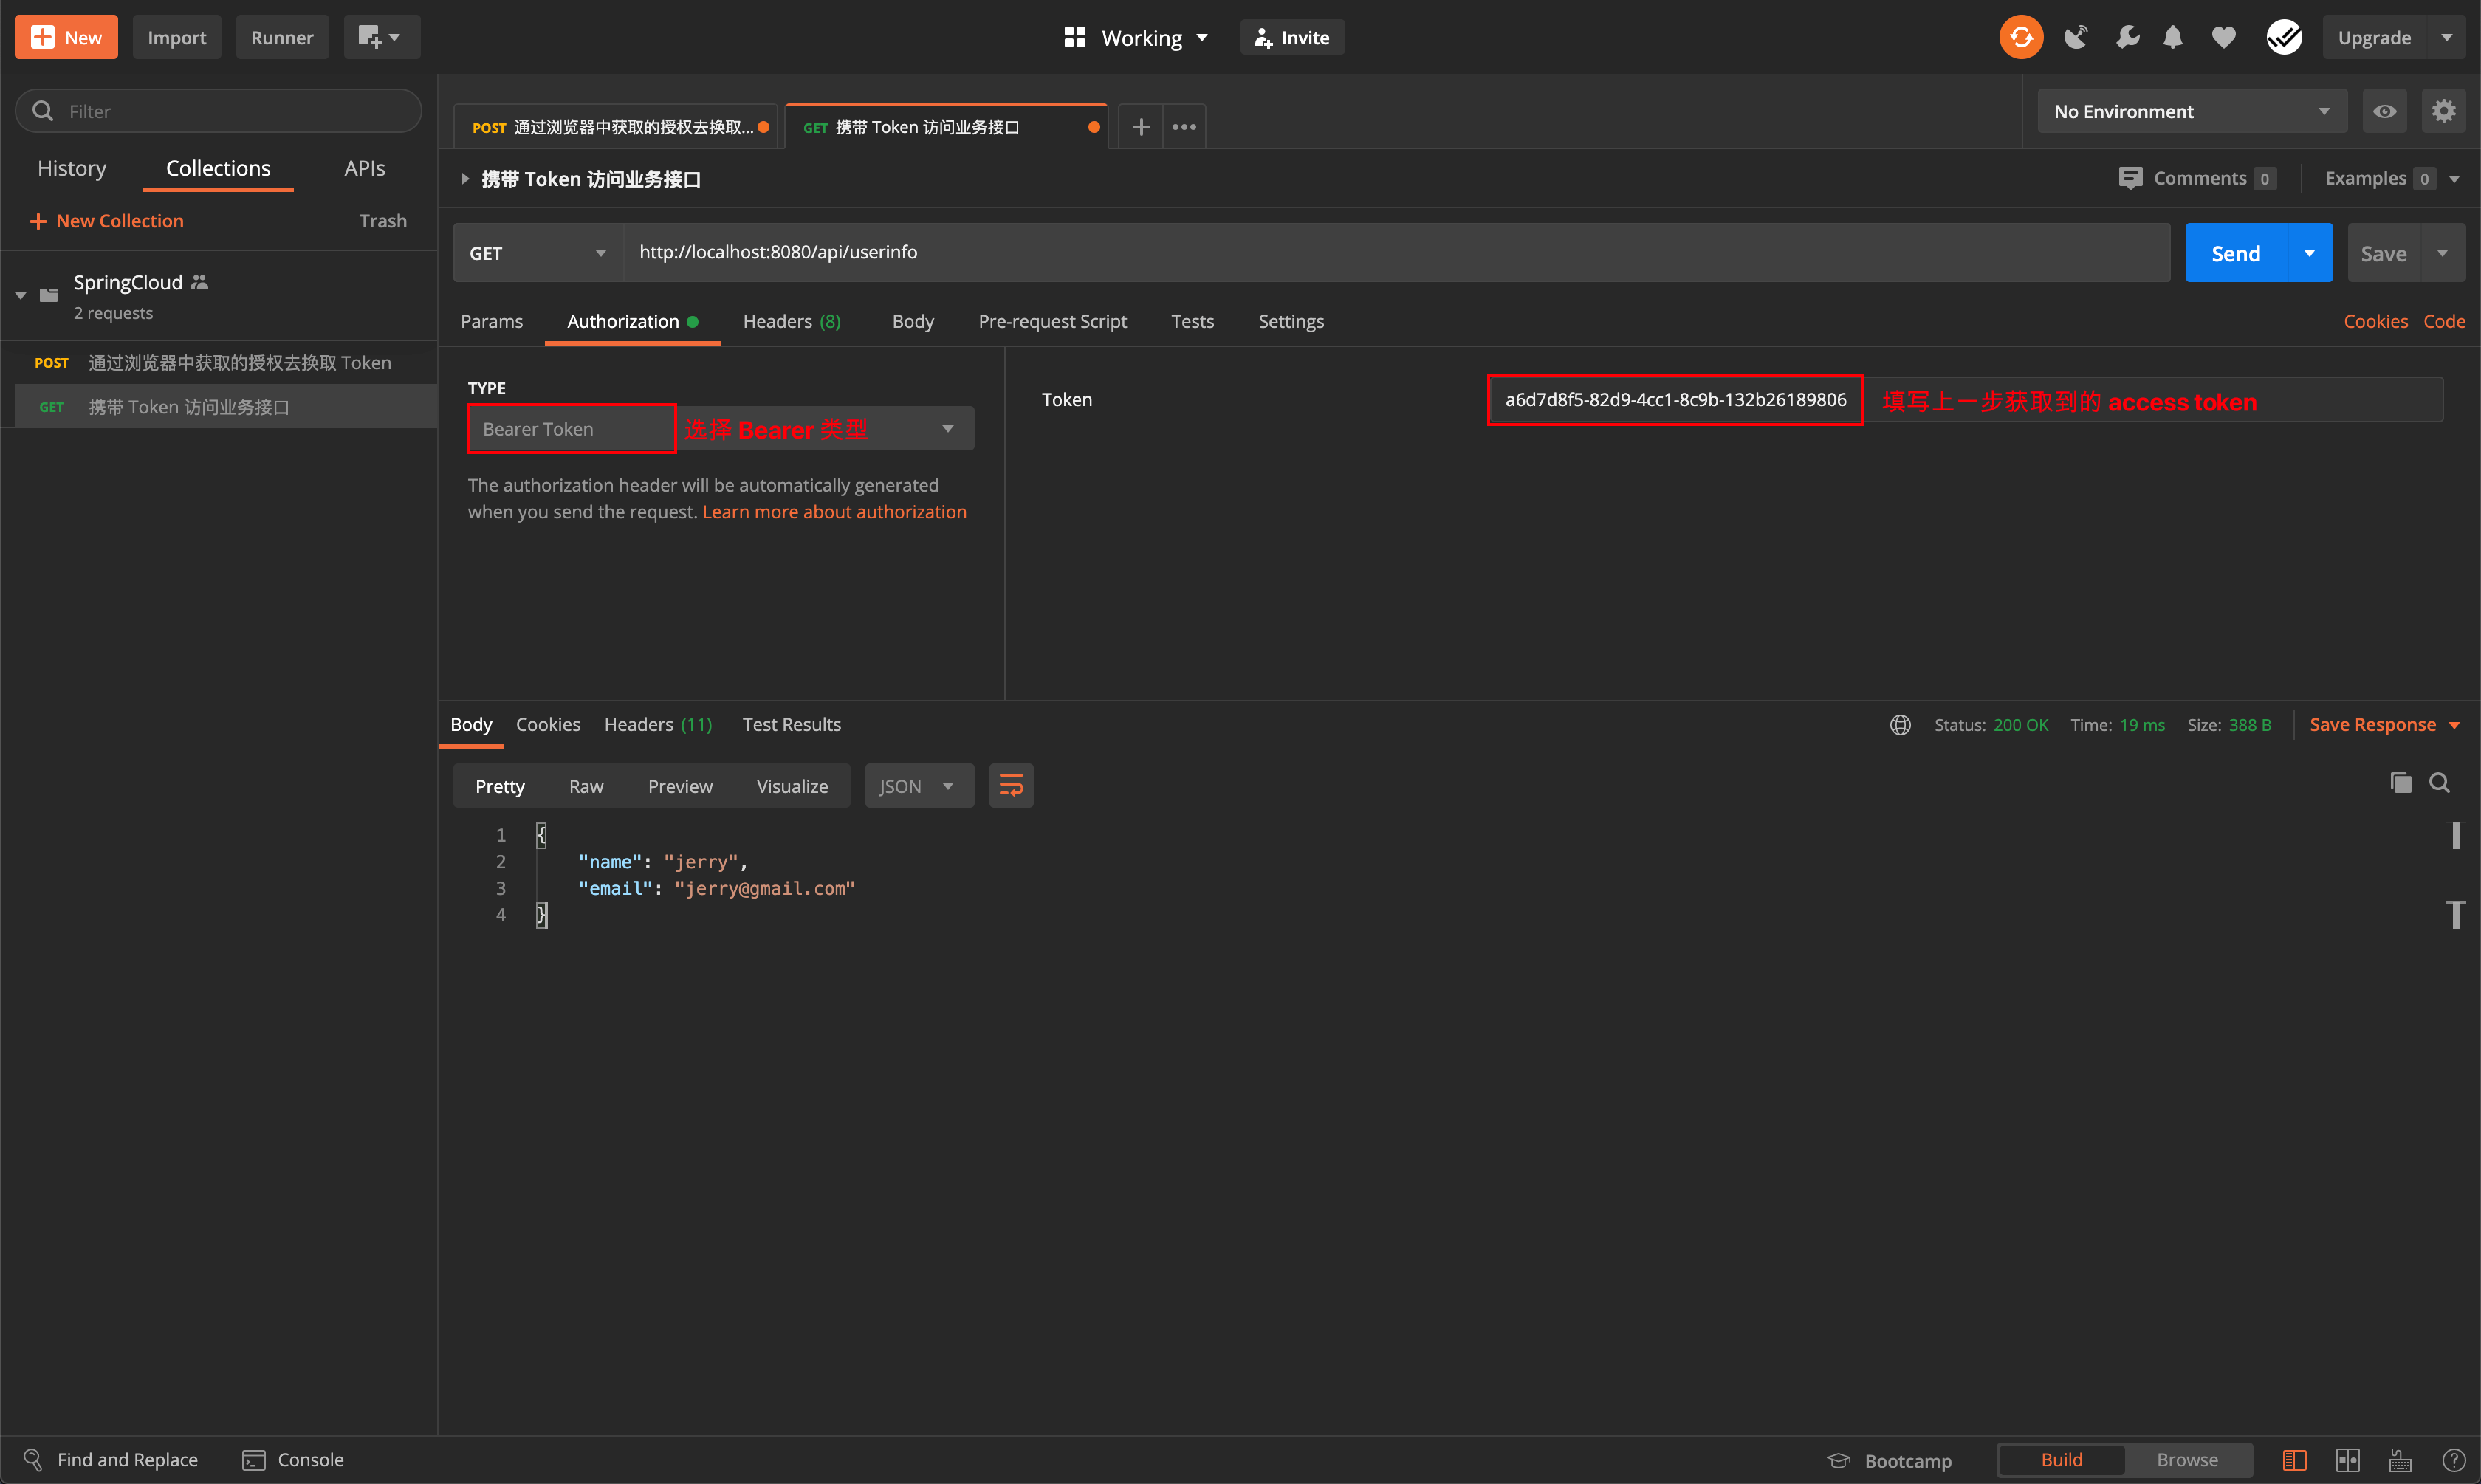
- 请求资源服务(业务请求)
如果你没有安装 Postman,对使用 curl 命令比较熟悉,那么可替换上面第 2,3 步操作
- 使用授权码获取 Token
1
2
# 请自行更换 code 参数的值
curl -X POST --user clientapp:112233 http://localhost:8080/oauth/token -H "content-type: application/x-www-form-urlencoded" -d "code=8uYpdo&grant_type=authorization_code&redirect_uri=http://localhost:9001/callback&scope=read_userinfo" - 请求资源服务(业务请求)
1
2
# 请自行更换 authorization 参数
curl -X GET http://localhost:8080/api/userinfo -H "authorization: Bearer 36cded80-b6f5-43b7-bdfc-594788a24530"

客户端模式
代码实现
授权服务器配置
1 |
|
Security Web安全配置
1 |
|
测试
整个过程请看视频
https://res.cloudinary.com/incoder/video/upload/v1594910477/blog/video/auth.mp4
- 获取授权
1
2
# 浏览器请求地址
http://localhost:8080/oauth/authorize?client_id=clientapp&redirect_uri=http://localhost:9001/callback&response_type=code&scope=read_userinfo - 使用授权码获取 Token
- 请求资源服务(业务请求)
如果你没有安装 Postman,对使用 curl 命令比较熟悉,那么可替换上面第 2,3 步操作
- 使用授权码获取 Token
1
2
# 请自行更换 code 参数的值
curl -X POST --user clientapp:112233 http://localhost:8080/oauth/token -H "content-type: application/x-www-form-urlencoded" -d "code=8uYpdo&grant_type=authorization_code&redirect_uri=http://localhost:9001/callback&scope=read_userinfo" - 请求资源服务(业务请求)
1
2
# 请自行更换 authorization 参数
curl -X GET http://localhost:8080/api/userinfo -H "authorization: Bearer 36cded80-b6f5-43b7-bdfc-594788a24530"
简化模式
代码实现
授权服务器配置
1 |
|
Security Web安全配置
1 |
|
测试
整个过程请看视频
https://res.cloudinary.com/incoder/video/upload/v1594910477/blog/video/auth.mp4
- 获取授权
1
2
# 浏览器请求地址
http://localhost:8080/oauth/authorize?client_id=clientapp&redirect_uri=http://localhost:9001/callback&response_type=code&scope=read_userinfo - 使用授权码获取 Token
- 请求资源服务(业务请求)
如果你没有安装 Postman,对使用 curl 命令比较熟悉,那么可替换上面第 2,3 步操作
- 使用授权码获取 Token
1
2
# 请自行更换 code 参数的值
curl -X POST --user clientapp:112233 http://localhost:8080/oauth/token -H "content-type: application/x-www-form-urlencoded" -d "code=8uYpdo&grant_type=authorization_code&redirect_uri=http://localhost:9001/callback&scope=read_userinfo" - 请求资源服务(业务请求)
1
2
# 请自行更换 authorization 参数
curl -X GET http://localhost:8080/api/userinfo -H "authorization: Bearer 36cded80-b6f5-43b7-bdfc-594788a24530"
测试
1 | http://localhost:8080/oauth/authorize?client_id=clientapp&redirect_uri=http://localhost:9001/callback&response_type=token&scope=read_userinfo&state=abc |
1 | http://localhost:9001/callback#access_token=60fbfadc-f801-4514-a5fb-52c6fd42f6cb&token_type=bearer&state=abc&expires_in=119 |
密码模式
https://github.com/spring-projects/spring-boot/issues/11136#issuecomment-381338605
代码实现
授权服务器配置
1 |
|
Security Web安全配置
1 |
|
测试
整个过程请看视频
https://res.cloudinary.com/incoder/video/upload/v1594910477/blog/video/auth.mp4
- 获取授权
1
2
# 浏览器请求地址
http://localhost:8080/oauth/authorize?client_id=clientapp&redirect_uri=http://localhost:9001/callback&response_type=code&scope=read_userinfo - 使用授权码获取 Token
- 请求资源服务(业务请求)
如果你没有安装 Postman,对使用 curl 命令比较熟悉,那么可替换上面第 2,3 步操作
- 使用授权码获取 Token
1
2
# 请自行更换 code 参数的值
curl -X POST --user clientapp:112233 http://localhost:8080/oauth/token -H "content-type: application/x-www-form-urlencoded" -d "code=8uYpdo&grant_type=authorization_code&redirect_uri=http://localhost:9001/callback&scope=read_userinfo" - 请求资源服务(业务请求)
1
2
# 请自行更换 authorization 参数
curl -X GET http://localhost:8080/api/userinfo -H "authorization: Bearer 36cded80-b6f5-43b7-bdfc-594788a24530"
扩展
附录
- 芋道 Spring Security OAuth2 存储器
- 浅谈 OAuth 2.0 (二) - 授权类型
- Spring Security OAuth2