iTerm2 日常
iTerm2是一款优秀强大的第三方终端,相信用 Mac 的开发者,一定听过或者用过 iTerm2 这款终端应用,如果你还没使用过,没关系那么本篇文章就带你了解学习 iTerm2 中的一些常用操作,来提高你的工作效率
安装配置
下载
iTerm2官网
注意:
系统自带的终端默认使用bash;iTerm2默认使用zsh,因此两者切换如下命令
1 | # 安装完iTerm 可使用如下命令来切换 |
配置
基础设置
-
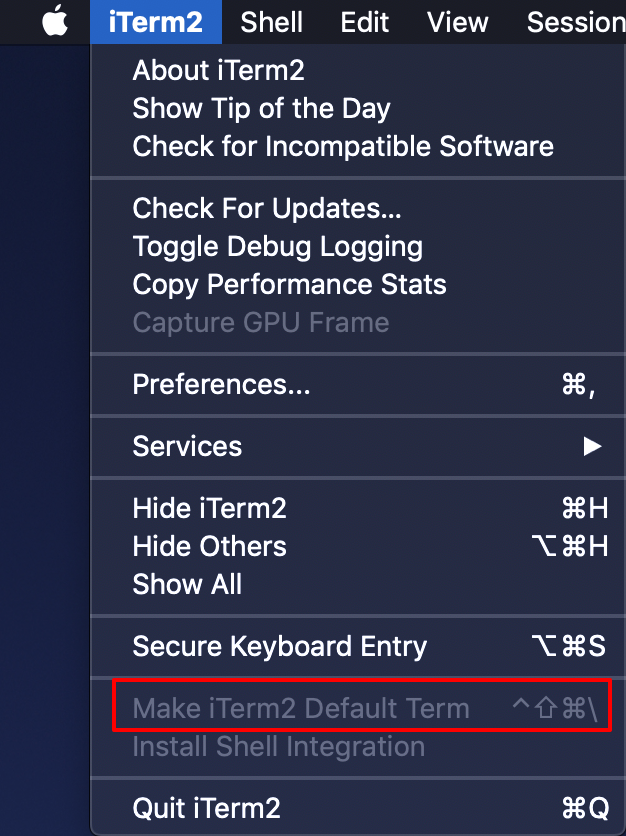
默认应用
MenuBar -> iTerm2 -> Make iTerm2 Default Term
-
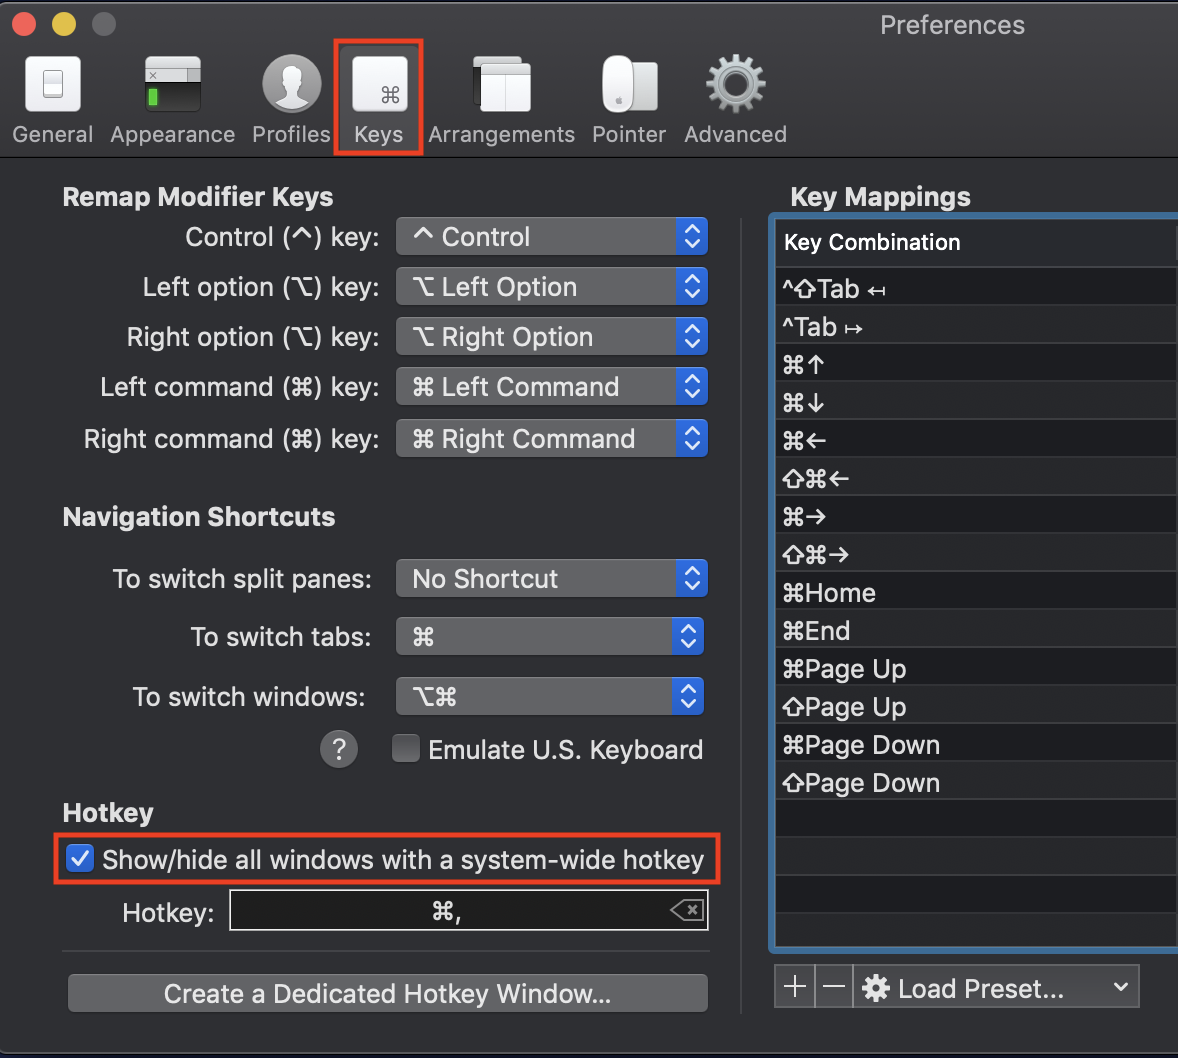
全局热键
MenuBar -> iTerm2 -> preference -> Keys -> Show/hide iTerm2 with a system-wide hotkey
输入设置的快捷键,这里使用⌘,
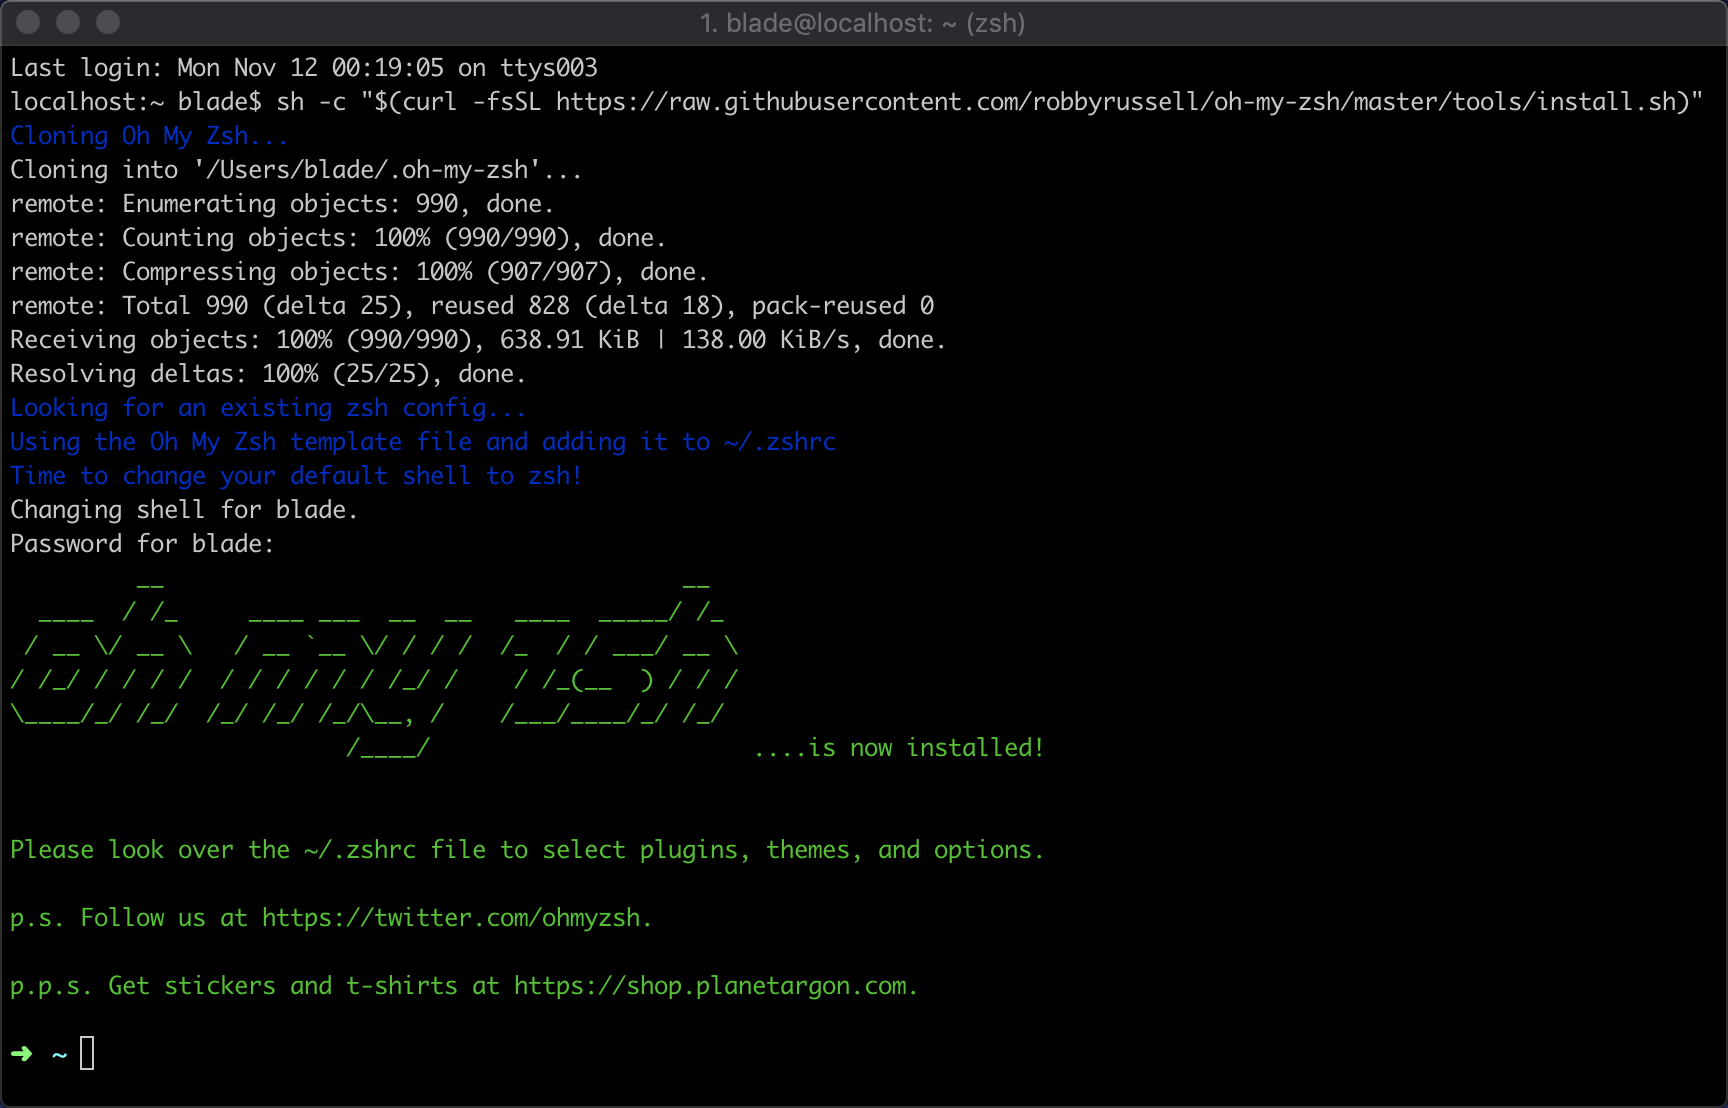
安装Oh my zsh
- 方式一:crul
1
sh -c "$(curl -fsSL https://raw.githubusercontent.com/robbyrussell/oh-my-zsh/master/tools/install.sh)"
- 方式二:wget
1
sh -c "$(wget https://raw.githubusercontent.com/robbyrussell/oh-my-zsh/master/tools/install.sh -O -)"
PowerLine
1 | pip install powerline-status --user |
如果提示:
command not found: pip
先执行,再执行上面的字体安装命令
1 | sudo easy_install pip |
安装PowerFonts
为避免后续的使用中,可能会遇到字符乱码的问题,因此安装字体
字体库需要首先将项目clone到本地,然后执行源码中的install.sh,根据自己的喜好存放在指定的位置
1 | # 进入Documents目录 |
设置字体及背景
-
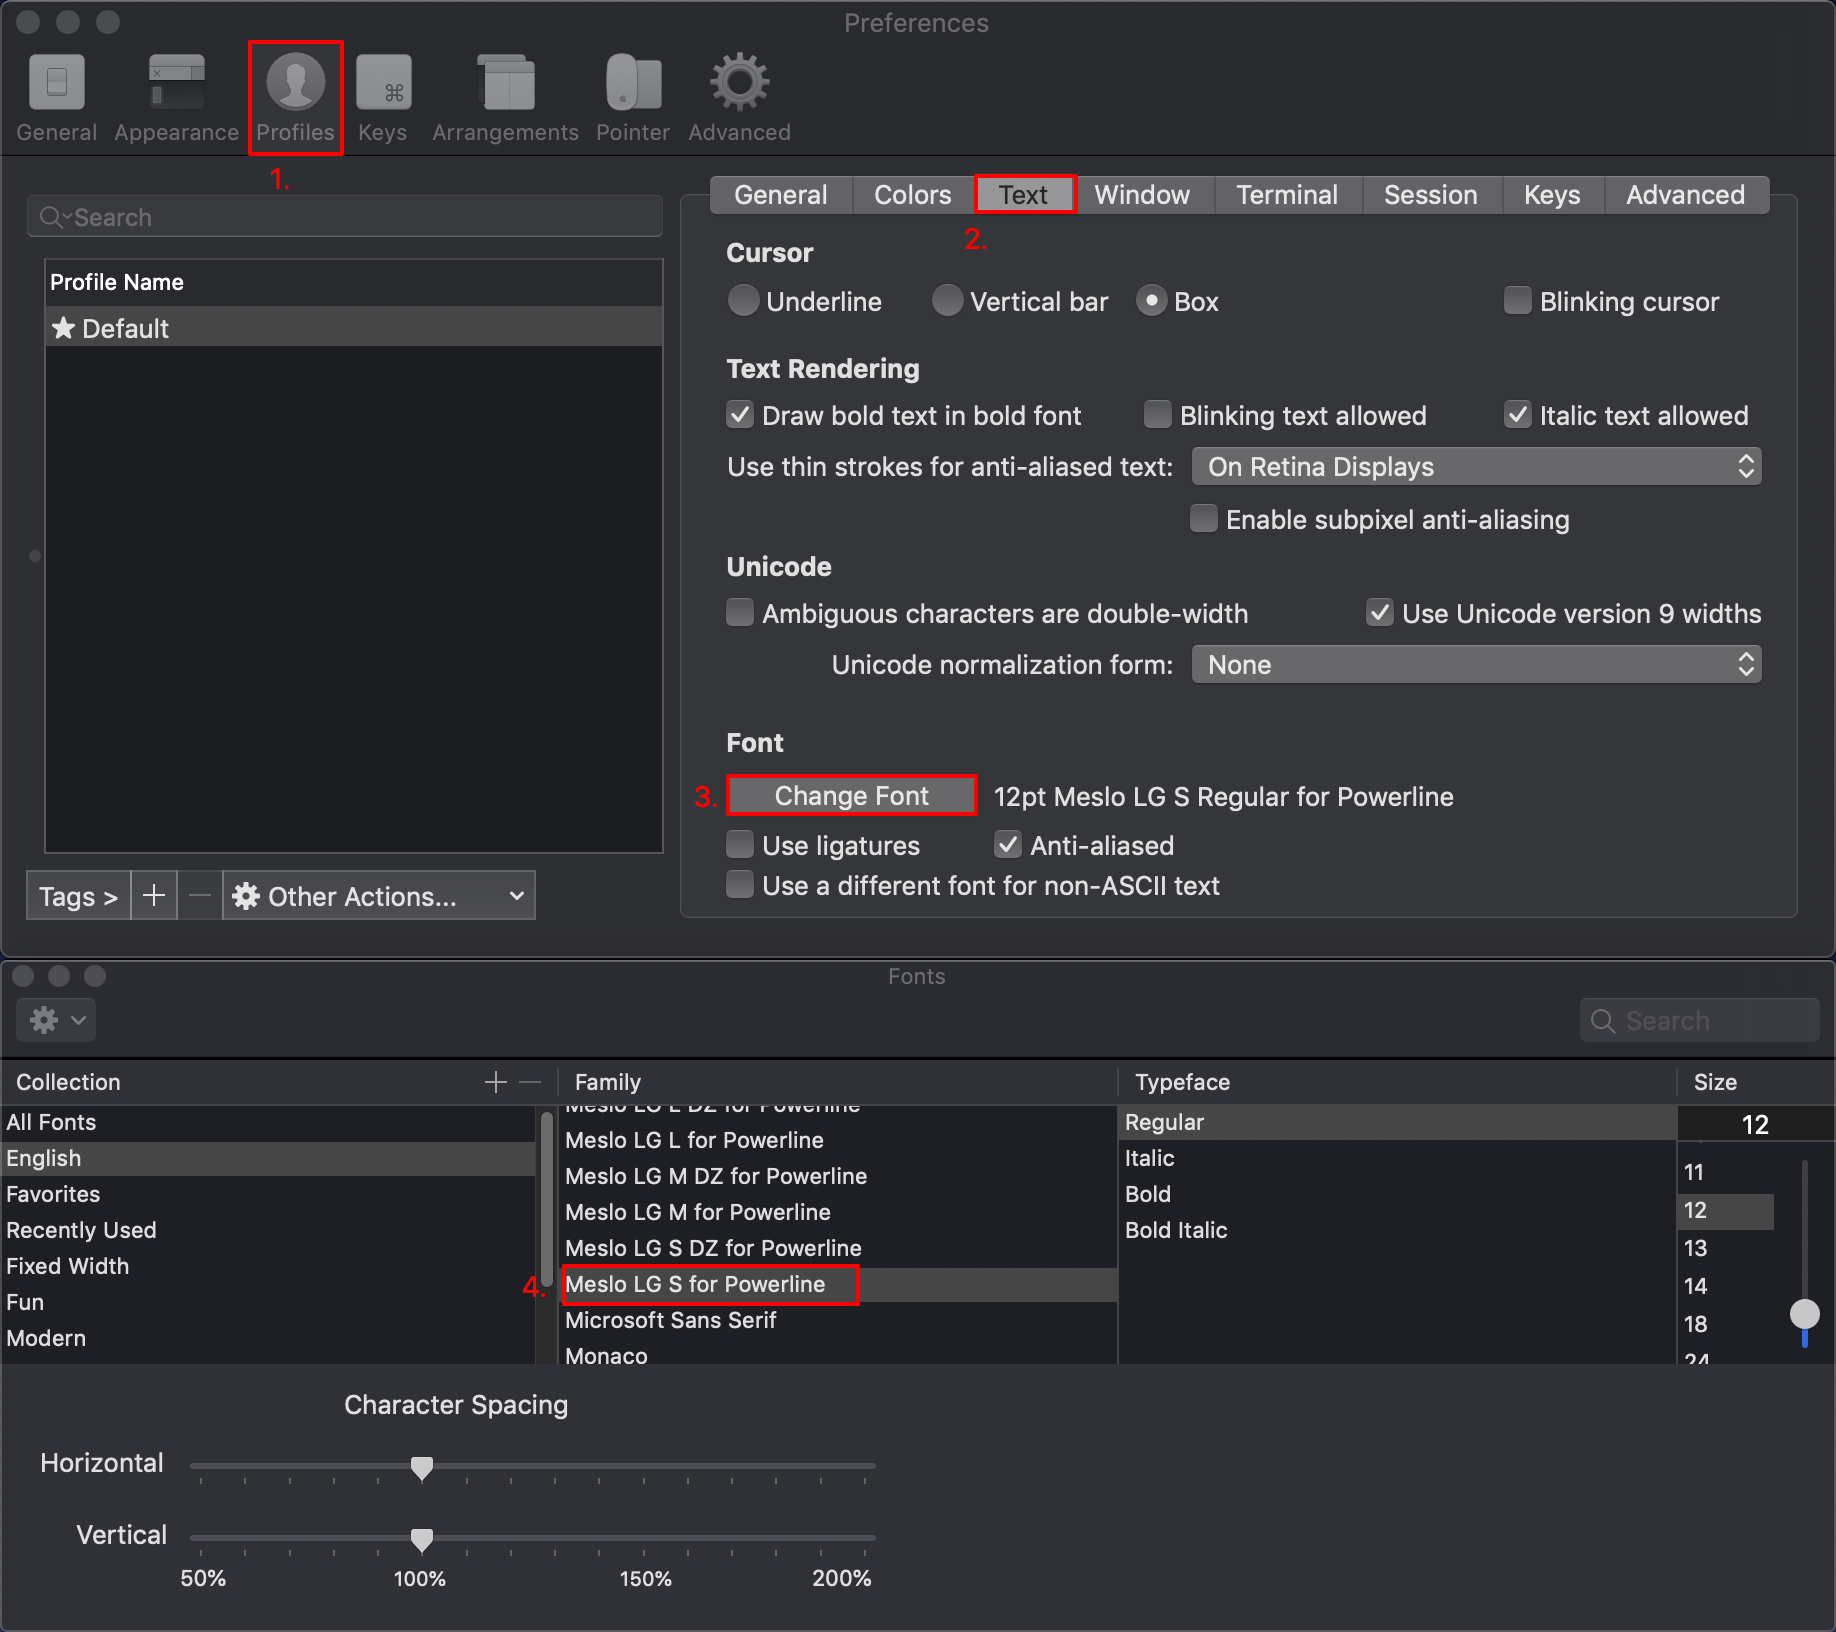
设置字体
MenuBar -> iTerm2 -> Preferences -> Profiles -> Text -> Change Font,选择Meslo LG字体,L,M,S风格,看个人喜好,这里选择Meslo LG S Powerline
-
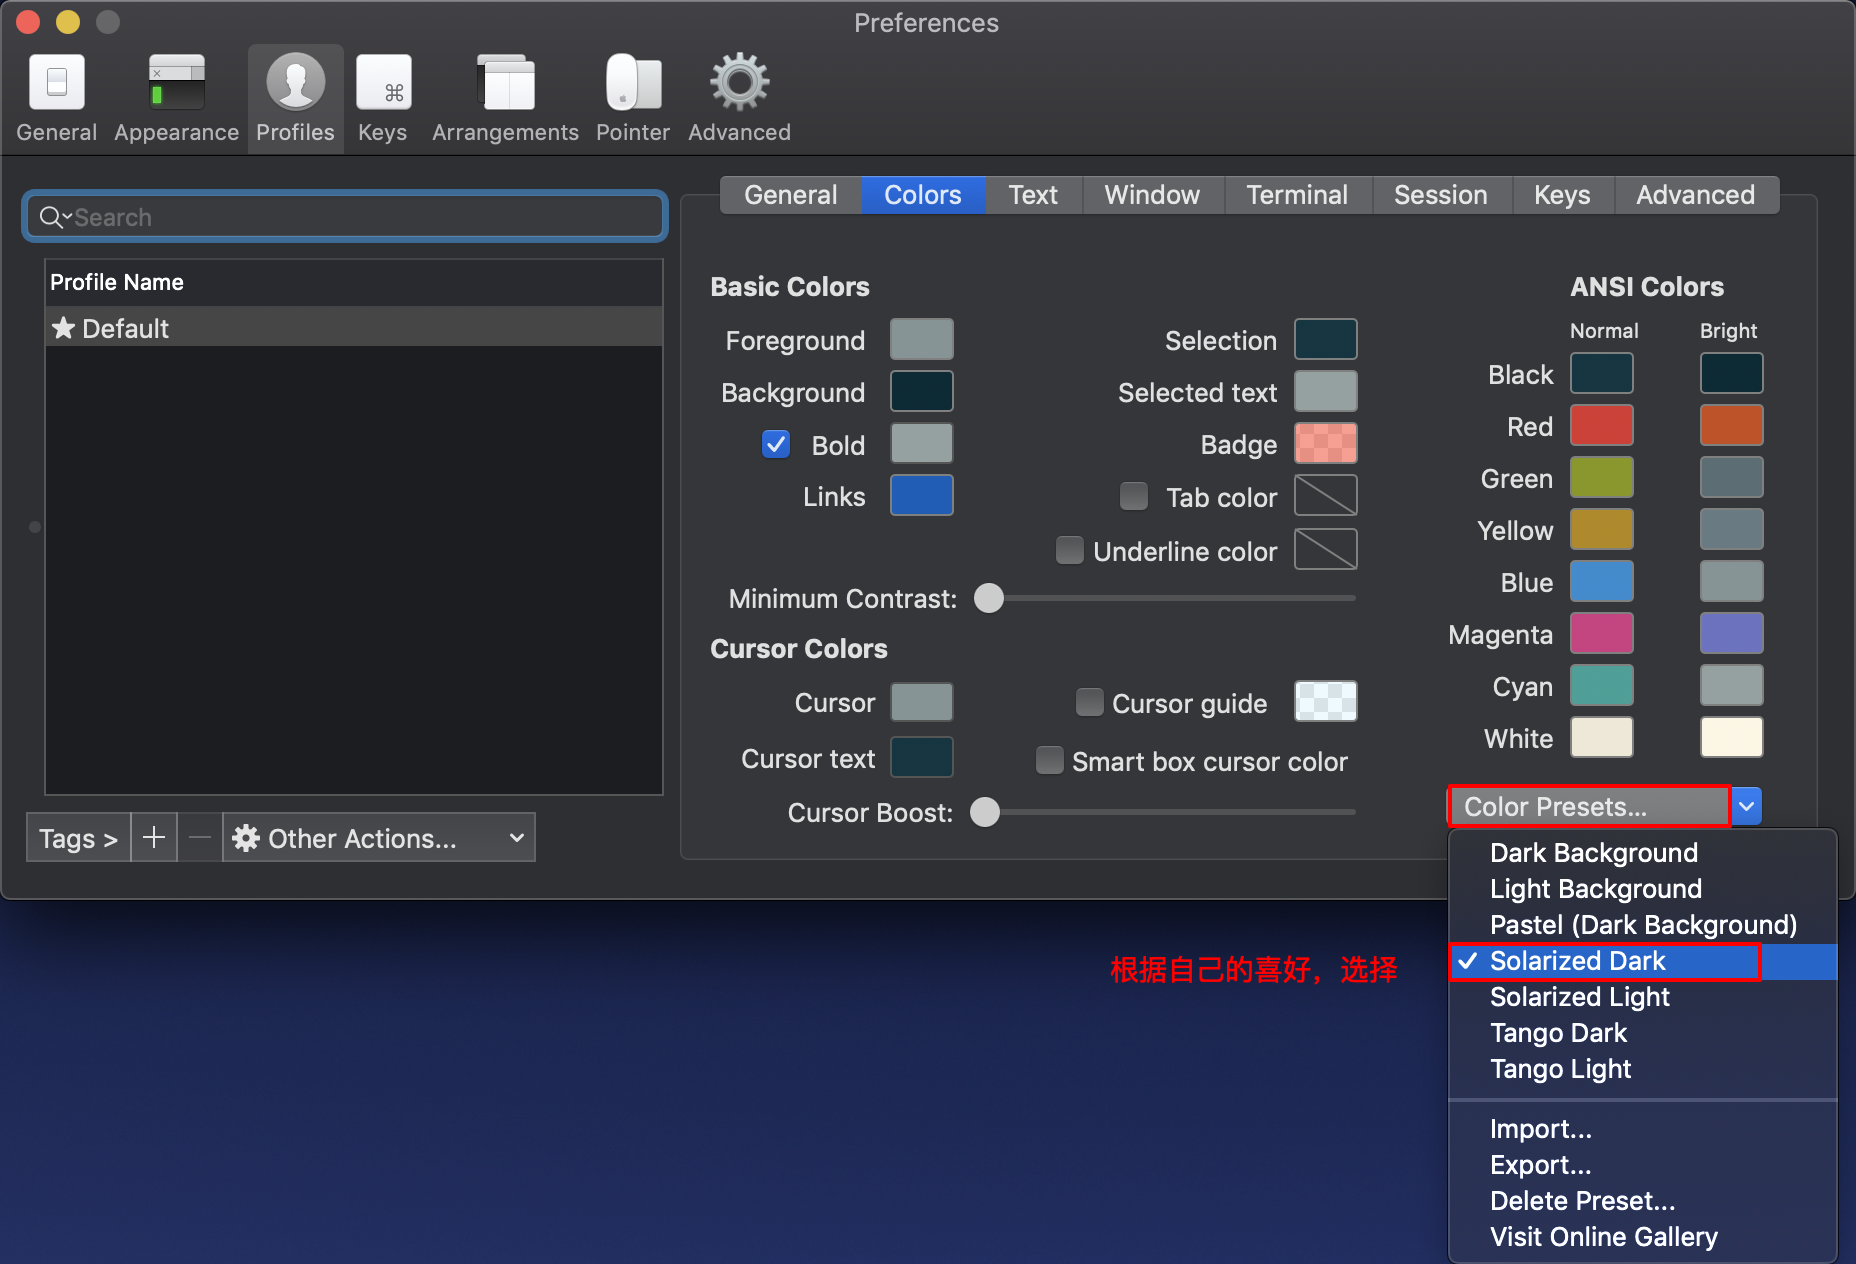
背景设置
修改主题
1 | # 打开.zshrc隐藏文件 |
默认:ZSH_THEME=“robbyrussell”
辅助
- 高亮插件 最后,对配置文件进行生效处理
1
2
3
4
5
6
7
8
9
10cd ~/.oh-my-zsh/custom/plugins/
git clone https://github.com/zsh-users/zsh-syntax-highlighting.git
vim ~/.zshrc
# 添加zsh-syntax-highlighting到plugins中,放在git后面
plugins=(
git
zsh-syntax-highlighting
)
# 文件最后添加,然后保存并退出
source ~/.oh-my-zsh/custom/plugins/zsh-syntax-highlighting/zsh-syntax-highlighting.zsh1
source ~/.zshrc
- 命令补全
安装步骤和上面的高亮插件一致1
2
3
4
5cd ~/.oh-my-zsh/custom/plugins/
git clone https://github.com/zsh-users/zsh-autosuggestions
vi ~/.zshrc - 设置背景图
iTerm2 -> Preferences -> Profiles -> Window -> BackGround Image
主题选择
Oh my zsh 本身也包含了很多主题,而我比较喜欢的一款 powerlevel10k 的主题,非常的简洁,满足我的装 X 的需求的同时,极其简单的设置也是我对其爱不释手。
之前最早使用的是 powerlevel9k,我的博客里面一些终端的截图就是 powerlevel9k,但随着我的需求越来越多以及加载的插件也越来越多,我不能忍受 iTerm2 在使用 时的效率问题,然后就看到了powerlevel10k,它是在powerlevel9k 的基础上迭代的,大大提高了响应效率和更加简洁的配置等
安装
官方提供了多种安装方式(Manual,Oh My Zsh,Homebrew 等等),选择你熟系的方式进行安装,我这里使用 Oh My Zsh 方式安装,选择了 gitee 镜像地址进行下载
1 | # 1. 下载主题 |
默认安装路径:/Users/
<PC USER NAME>/.oh-my-zsh/custom/themes/powerlevel10k
更新
当初选择的什么安装方式,就使用什么方式进行更新,我这里以 Oh My Zsh 方式进行更新
1 | git -C ${ZSH_CUSTOM:-$HOME/.oh-my-zsh/custom}/themes/powerlevel10k pull |
配置
只需要在终端()或者 iTerm2 命令窗口中输入 p10k configure 即可,然后根据提示选择即可完成配置,我比较懒,就用的 Pure 样式
问题
VS Code
在 VS Code Terminal 中显示不出来图标或者显示乱码异常等问题,先设置 VS Code 字体看看是否能解决,如果不能再进行排查
Open File → Preferences → Settings, 在搜索框中输入terminal.integrated,字体设置为MesloLGS NF.
常用工具
Homebrew
- Homebrew 是一款自由及开放源代码的软件包管理系统,用以简化macOS系统上的软件安装过程,最初由马克斯·霍威尔(Max Howell)写成
- Homebrew Cask,它是一套建立在 Homebrew 基础之上软件安装命令行工具,是 Homebrew 的扩展
官方
如果你使用的官方安装教程,需要切换 brew 的镜像源,可参考 专治各种网络不服 文章
安装
在你的终端(Terminal/iTerm2)运行如下脚本
1 | /bin/bash -c "$(curl -fsSL https://raw.githubusercontent.com/Homebrew/install/master/install.sh)" |
卸载
1 | ruby -e "$(curl -fsSL https://raw.githubusercontent.com/Homebrew/install/master/uninstall)" |
国内(推荐)
按照命令行上面的提示,进行安装
安装
1 | /bin/zsh -c "$(curl -fsSL https://gitee.com/cunkai/HomebrewCN/raw/master/Homebrew.sh)" |
卸载
1 | /bin/zsh -c "$(curl -fsSL https://gitee.com/cunkai/HomebrewCN/raw/master/HomebrewUninstall.sh)" |
常用命令
对于 brew 和 brew cask 的命令基本一致,比如
- 【brew】:brew install [包名]
- 【brew cask】:brew cask install [包名]
brew 基础命令
1 | # 安装指定包应用,如:brew install wget |
brew service
1 | # 查看使用brew安装的服务列表 |
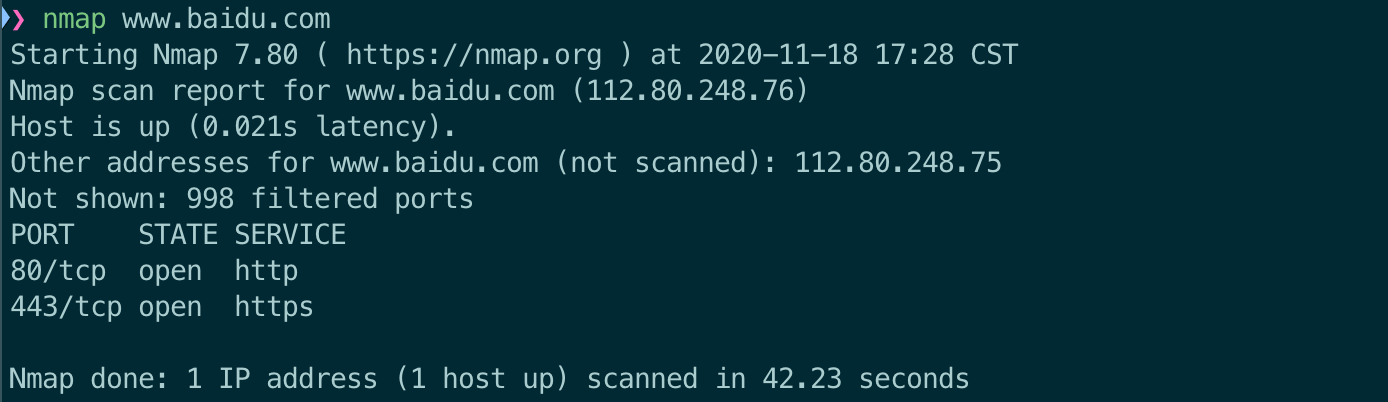
Nmap
端口扫描必备工具
1 | # 安装 nmap 工具 |
常用快捷键
标签
- 新建标签:⌘(command) + t
- 关闭标签:⌘(command) + w
- 切换标签:⌘(command) + 数字 ⌘(command) + 左右方向键
- 切换全屏:⌘(command) + enter
- 查找:⌘(command) + f
分屏
- 垂直分屏:⌘(command) + d
- 水平分屏:⌘(command) + ⇧(shift) + d
- 切换屏幕:⌘(command) + ⌥(option) + 方向键 ⌘(command) + [ 或 ⌘(command) + tab 所在的数字]
- 查看历史命令:⌘(command) + ;
- 查看剪贴板历史:⌘(command) + ⇧(shift) + h
其他
- 清除当前行:⌘(command) + u
- 清屏:⌘(command) + r
- 列出剪切板历史:⌘(command) + ⇧(shift) + h
- 命令快照(很实用的一个功能):⌘(command) + ⌥(option) + b
大概只能记录 30s 左右的操作
常见问题
文本乱码
在一开始使用macOS就已经安装iTerm2来代替了系统自带的Terminal应用,毕竟颜值是决定要不用长期使用的重要因素
iTerm2对应的配置文件:.zshrc,Terminal对于的配置文件:.bash_profile 或 .bashrc
- 问题:iTerm2查看本地文件,能正常显示,无乱码,但查看服务器上文件,出现乱码
- 原因:本地iTerm2终端和服务器字符集不一致,造成乱码,macOS默认Terminal应用是
utf-8,而iTerm2默认没有设置utf-8编码 - 解决办法:给本地的
.zshrc设置字符集编码1
2
3
4
5
6
7# 使用vim打开.zshrc文件
vim ~/.zshrc
# 在文本内容末尾添加以下两行内容进行字符编码设置
export LC_ALL=en_US.UTF-8
export LANG=en_US.UTF-8
# 保存文件内容,退出vim模式,并使刚刚设置的内容生效
source ~/.zshrc帮助:可以在本地和服务器上分别使用
locale命令来查看,本地和服务器的字符编码是否一致
结束指定进程
1 | # 查看指定端口号 lsof -i:端口号 |
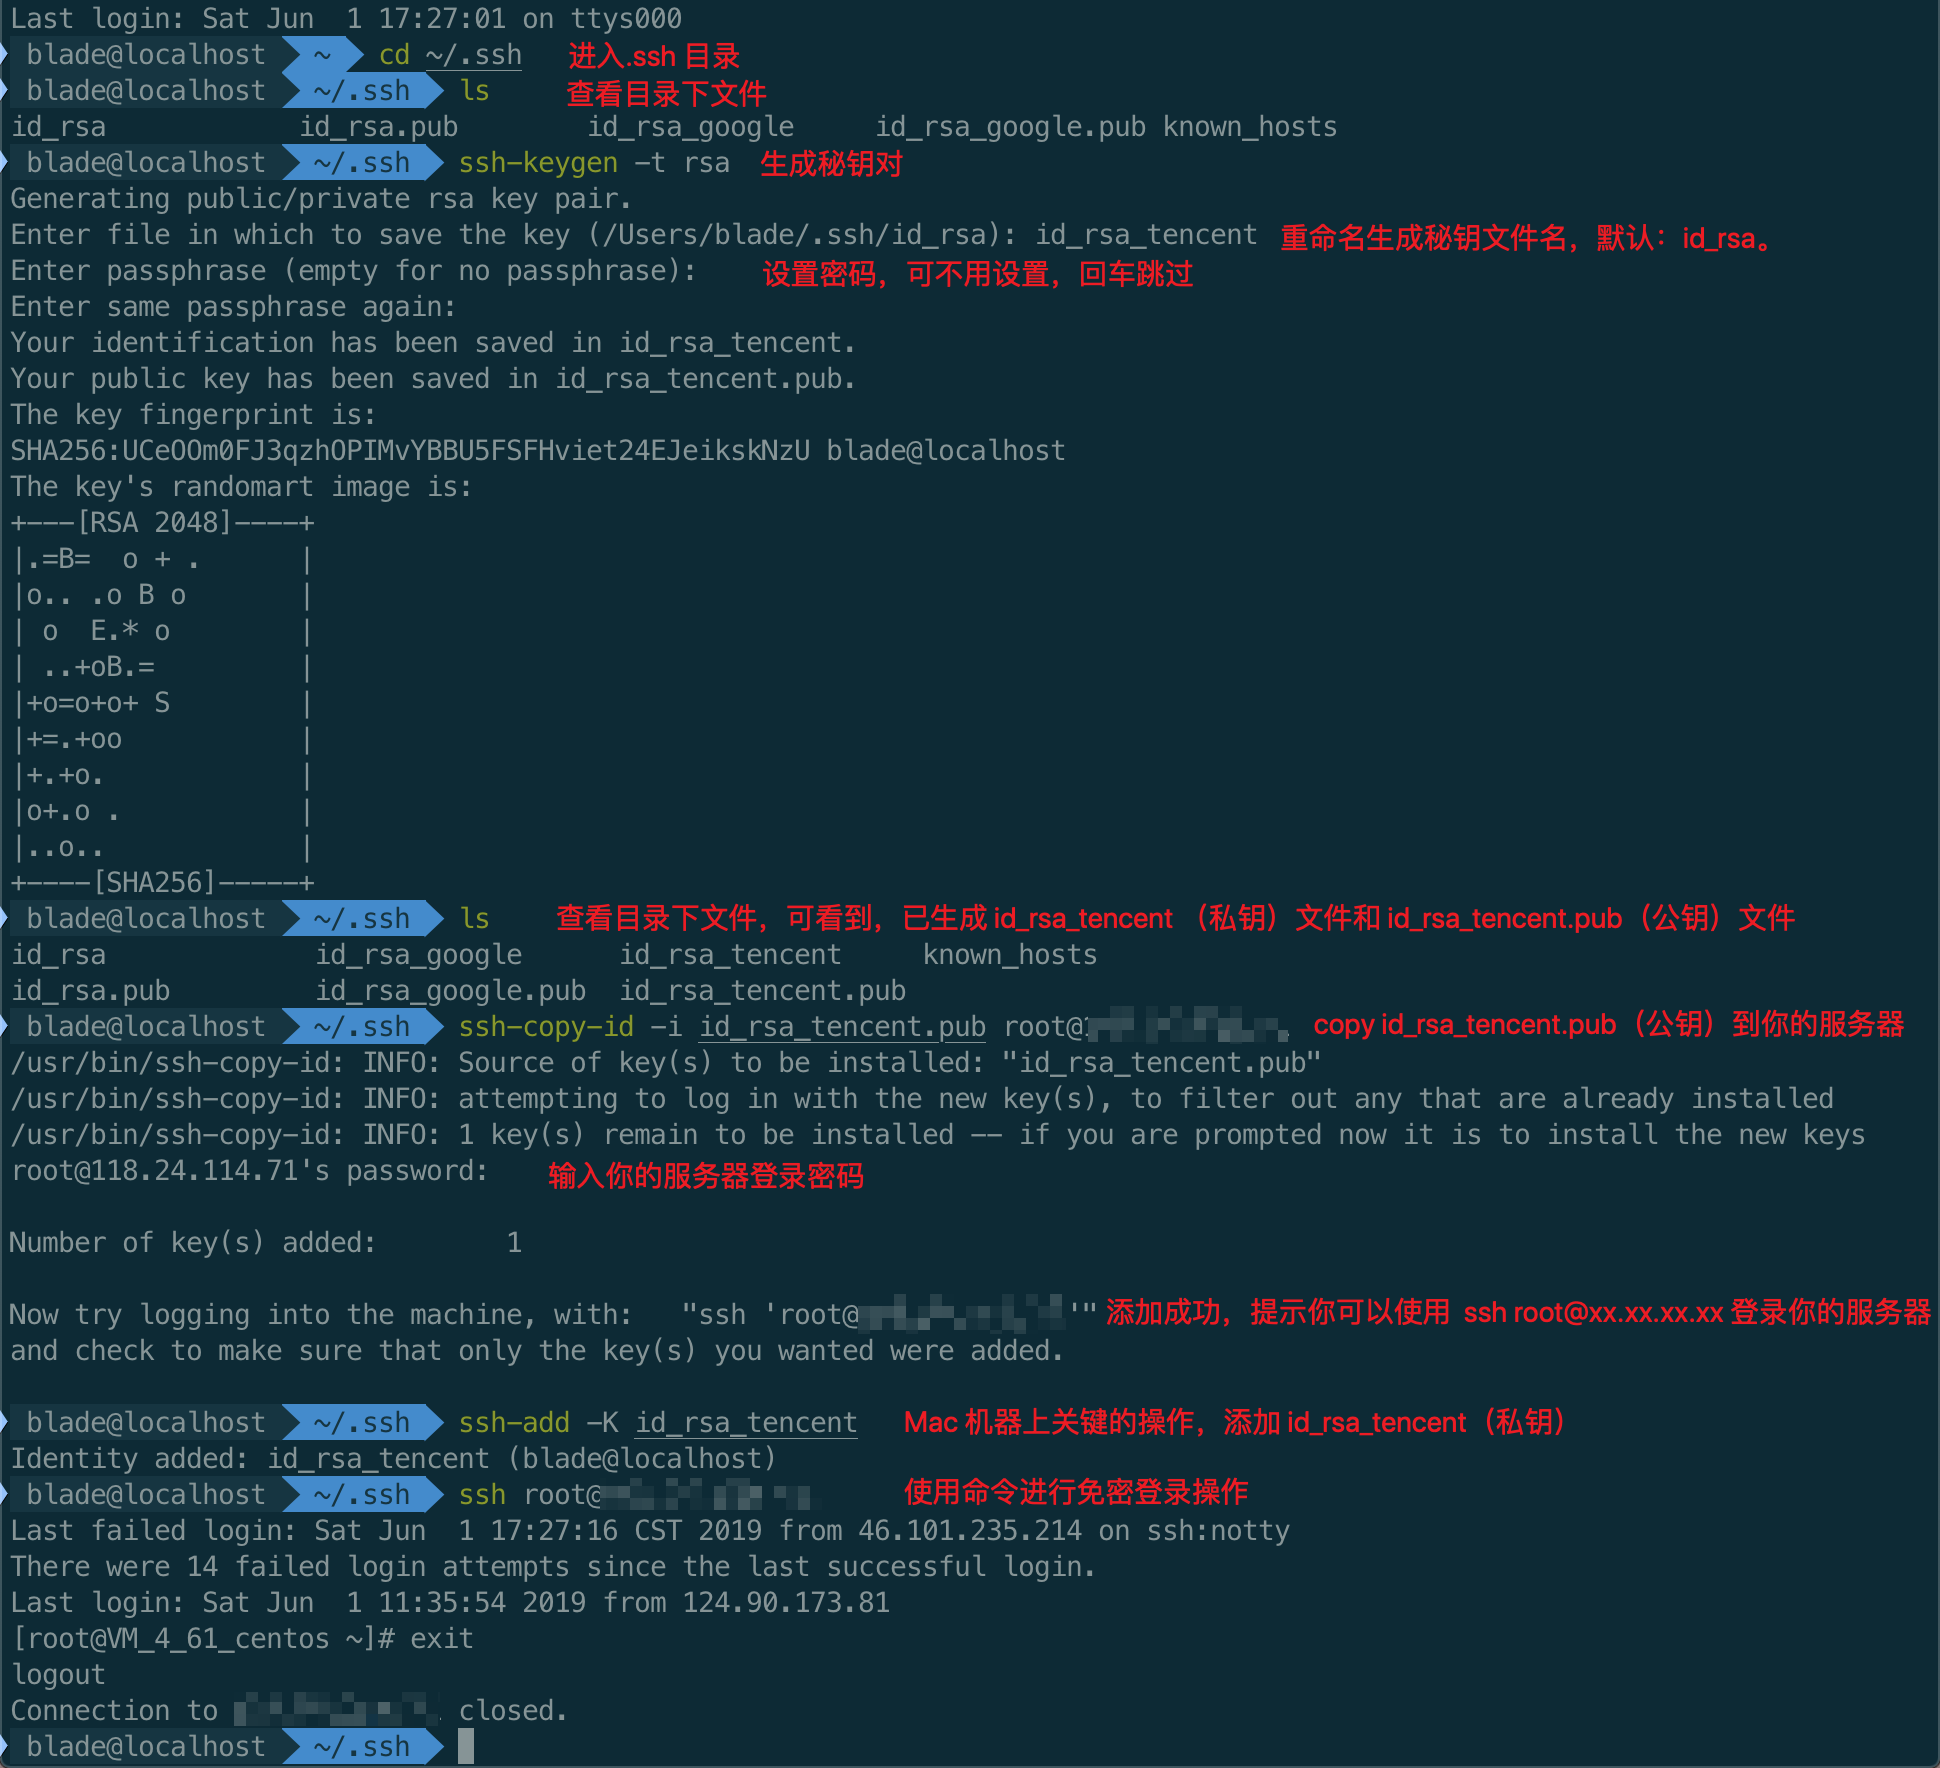
免密登录服务器
一图胜千言,请看图
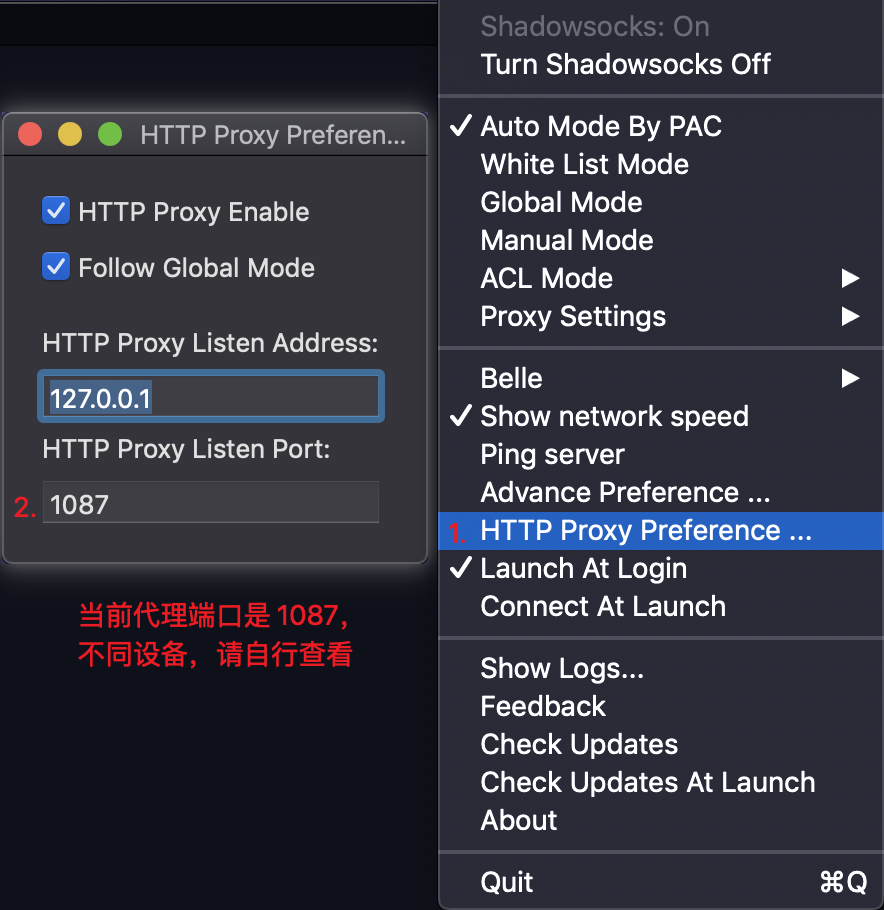
代理处理
在 Mac 系统上,使用 iTerm2 是一件很享受的过程,很多事情都可以通过命令行直接完成,但是一个致命的问题是,很多连接在国内环境下,异常忙,比如通过命令 clone 或处理 GitHub 上的项目,速度慢的让人抓狂,虽然电脑开启了代理(非全局),但视乎没有什么作用,针对此问题,需要让我们的终端也通过代理
- install privoxy
1
brew install privoxy
- setting privoxy
1
vim /usr/local/etc/privoxy/config
- config privoxy
1
2listen-address 0.0.0.0:xxxx
forward-socks5 / localhost:1080 .0.0.0.0 可以让其他设备访问到,若不需要,请修改成用 127.0.0.1;xxxx是HTTP代理的默认端口;
localhost:1080 是 SOCKS5(shadowsocks) 默认的地址,可根据需要自行修改,且注意不要忘了最后有一个空格和点号。 - start privoxy 代理端口查看
1
2
3
4
5
6# 因没有安装在系统目录内,所以启动的时候需要打全路径
sudo /usr/local/sbin/privoxy /usr/local/etc/privoxy/config
# 查看是否启动成功(1087 端口号换成自己的)
netstat -na | grep 1087
# 看到有类似如下信息就表示启动成功了
tcp4 0 0 *.1087 *.* LISTEN
- use proxy
- temp proxy
如果关闭终端标签页或窗口,功能就会失效- star proxy
1
2
3# 这里的端口号1087,换成你自己的
export http_proxy='http://localhost:1087'
export https_proxy='http://localhost:1087' - cancel proxy
1
2
3unset http_proxy
unset https_proxy
- star proxy
- auto proxy
- setting ~/.bash_profile
1
2
3
4
5
6
7# 打开.bash_profile 文件
vim ~/.bash_profile
# .bash_profile文件最后添加(1087 端口替换成你自己的)
export http_proxy='http://localhost:1087'
export https_proxy='http://localhost:1087'
# 保存文件 :wq 后,使配置生效
source ~/.bash_profile - 上面的方式也可以在文件(
.bash_profile)中加入如下方法,使用时只需要在终端中输入proxy_on命令,关闭输入proxy_off1
2
3
4
5
6
7
8
9
10
11
12function proxy_off(){
unset http_proxy
unset https_proxy
echo -e "已关闭代理"
}
function proxy_on() {
export no_proxy="localhost,127.0.0.1,localaddress,.localdomain.com"
export http_proxy="http://127.0.0.1:1087"
export https_proxy=$http_proxy
echo -e "已开启代理"
}
- setting ~/.bash_profile
- temp proxy
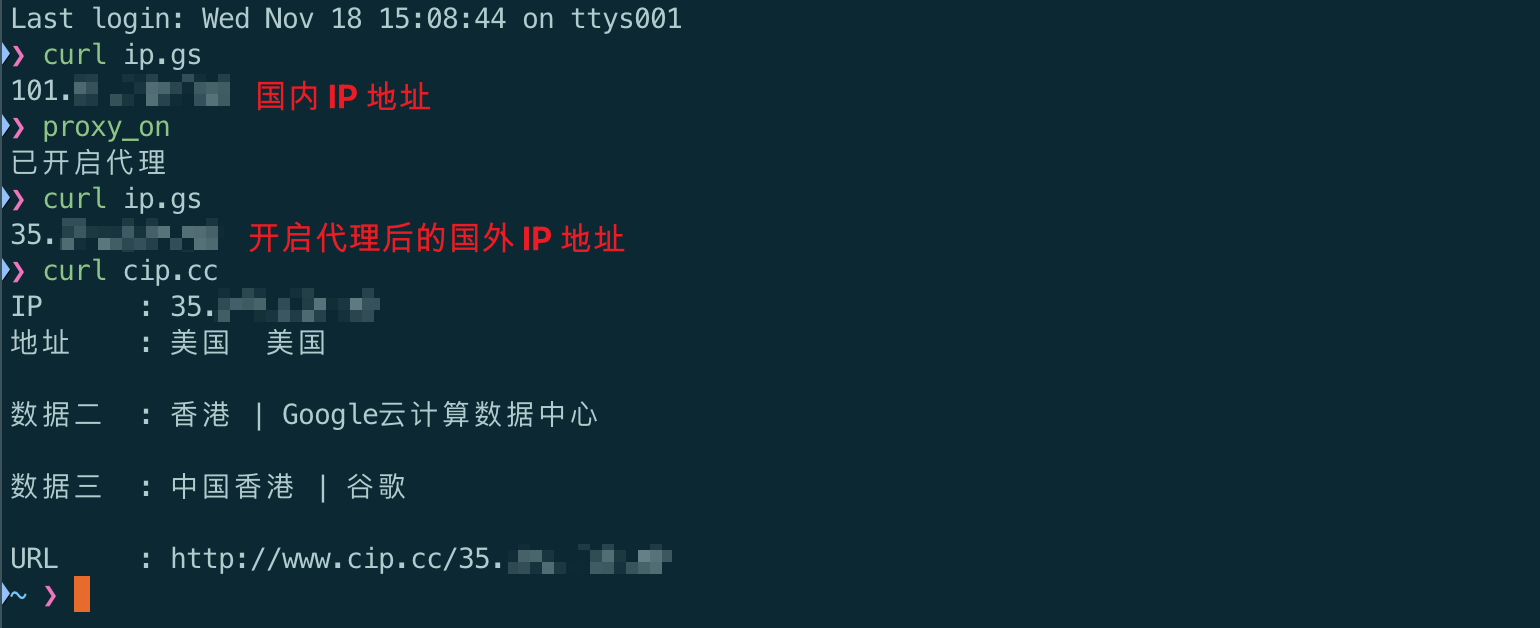
- test
1
2
# 已废弃,只能查看到当前的 IP 地址,其他信息请使用 curl cip.cc 命令
curl ip.gs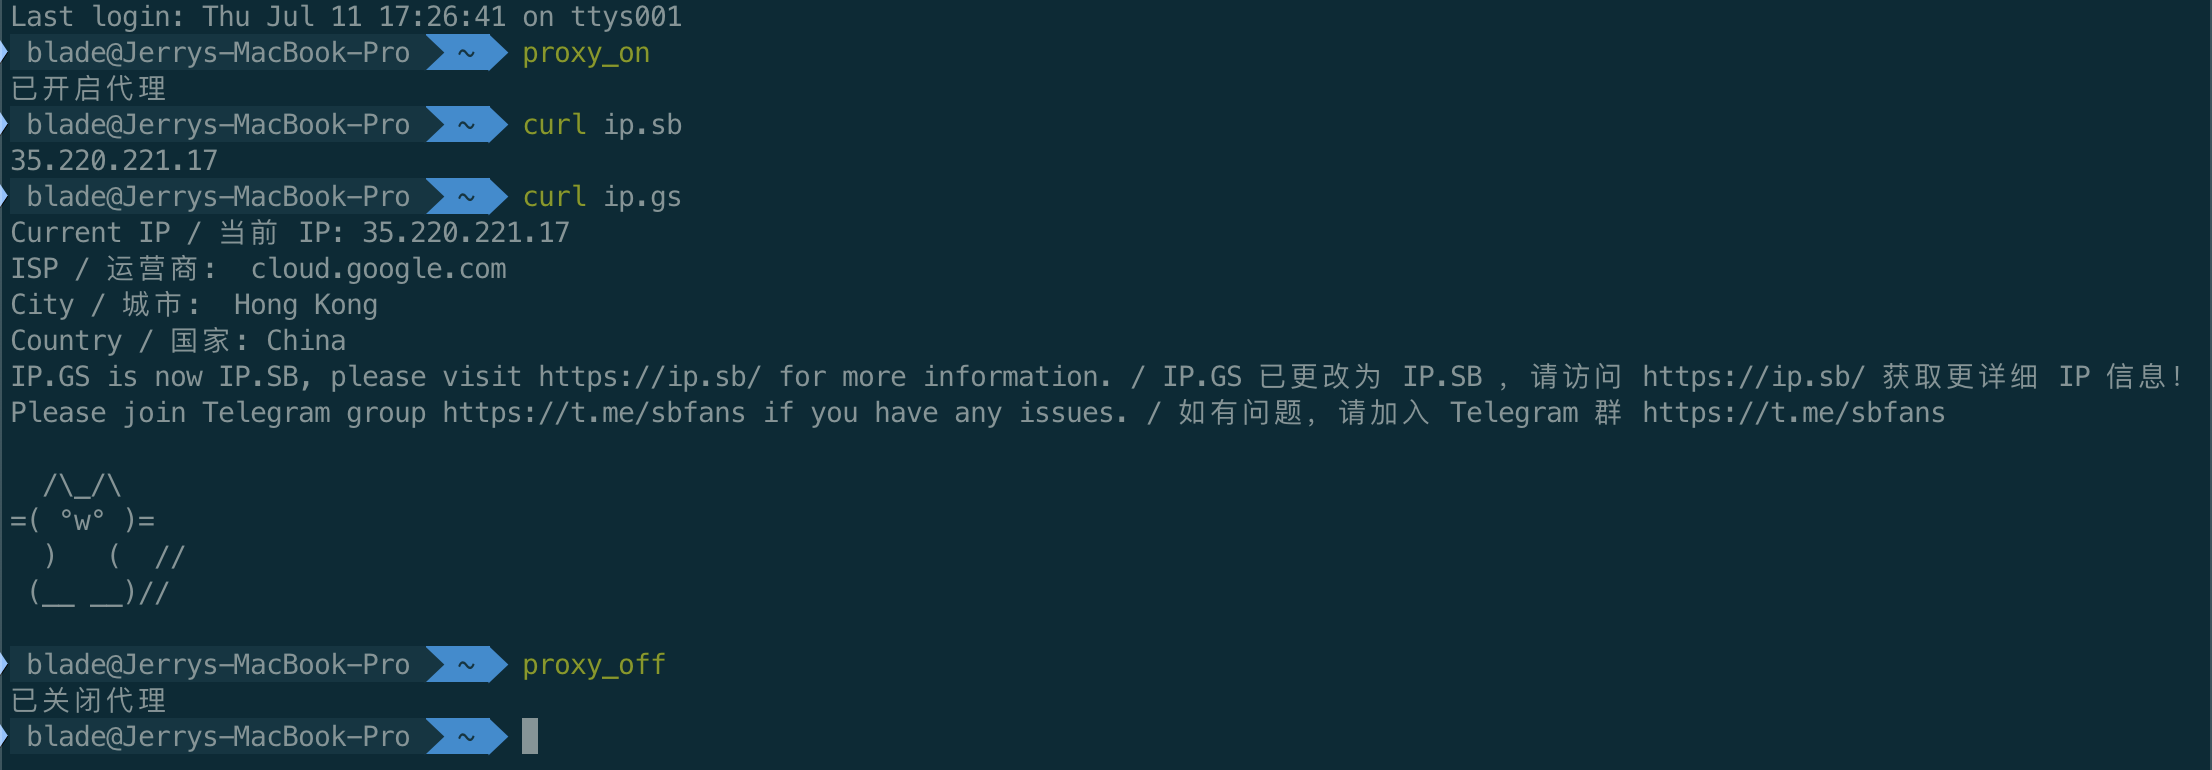
1
curl cip.cc
参考
- Mac终端-iTerm2使用
- Homebrew国内如何自动安装(国内地址)
- iTerm2 用法与技巧